Batch Processing
Copy page
Copy page as Markdown for LLMs
Open in Claude
Ask questions about this page
Batch processing allows you to submit multiple payment transactions simultaneously, streamlining operations for recurring transactions, bulk refunds, captures, void authorizations, and payment link generation. This service significantly reduces processing time and simplifies transaction management for high-volume merchants.
How Batch Processing Works
The batch processing workflow follows these steps:
File Preparation
Create a CSV file with transaction data following our template format.
File Upload
Upload your batch file through the dashboard or API endpoint.
Validation
System validates file format and transaction data integrity.
Processing
Approved transactions are processed in bulk automatically.
Results
Receive detailed processing results and transaction status updates.
Supported Operations
Batch processing supports the following transaction types:
| Operation | Description | Dashboard Support | API Support |
|---|---|---|---|
| Payment Links | Generate multiple payment links for customers | Yes | Yes |
| Refunds | Process bulk refunds for completed transactions | No | Yes |
| Captures | Capture multiple authorized transactions | No | Yes |
| Void Authorizations | Cancel multiple pending authorizations | No | Yes |
When using the merchant dashboard, only payment link generation is supported. All other batch operations must be performed through the API.
Integration Options
Choose the integration method that best fits your workflow:
Dashboard
User-friendly interface for bulk payment link generation without requiring technical integration.
API
Full batch processing capabilities including refunds, captures, void authorizations, and payment links with programmatic control.
Through the Dashboard
The dashboard method provides a user-friendly interface for bulk payment link generation without requiring technical integration.
Prerequisites
Before using dashboard batch processing:
- Account Access - Access to your Amazon Payment Services merchant dashboard
- Batch Service Active - Ensure batch processing is enabled on your account, contact merchantsupport-ps@amazon.com to enable this service
- CSV Template - Download and use our standardized template
Integration Steps
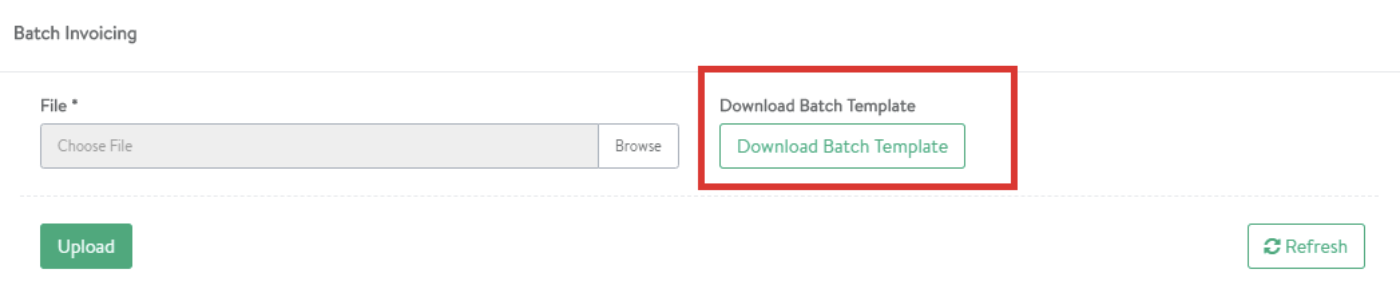
Access Batch Invoicing
- Log into your Amazon Payment Services merchant dashboard
- Navigate to the Batch Invoicing tab in the main menu
- Click Download batch template file to get the CSV template
Prepare CSV File
Fill the template with your transaction data according to the field specifications:
| Field Header | Type | Required | Description |
|---|---|---|---|
service_command | String | Required | Must be "PAYMENT_LINK" Example: PAYMENT_LINK |
language | String | Required | Payment link language Example: en, ar |
amount | Integer | Required | Amount in smallest currency unit Example: 10000 (for 100.00 AED) |
currency | String | Required | ISO currency code Example: AED, USD, SAR |
customer_email | String | Required | Customer email address Example: customer@example.com |
merchant_reference | String | Required | Unique transaction reference Example: ORD-12345-2024 |
request_expiry_date | String | Required | Link expiration date/time Example: 2025-12-01T15:00:55+03:00 |
link_command | String | Required | Transaction type Example: PURCHASE, AUTHORIZATION |
notification_type | String | Required | Delivery method Example: EMAIL, SMS, EMAIL,SMS |
customer_phone | String | Conditional | Required for SMS notifications Example: 966551234567 |
customer_name | String | Required | Customer full name Example: John Doe |
order_description | String | Optional | Transaction description Example: Monthly subscription fee |
payment_link_id | String | Optional | Custom link identifier Example: LINK-12345 |
Multiply your transaction amount by the currency decimal code per ISO code 3 before sending the amount parameter. For currencies with three-decimal codes, round VISA transactions to zero in the final decimal place to avoid declined transactions. Example: For 100.00 AED (2 decimal places per ISO code 3), multiply by 100 to send 10000 in your request.
Upload and Validate
- Save your file with .csv extension
- Click Browse and select your CSV file
- Upload the file to the Batch Invoicing interface
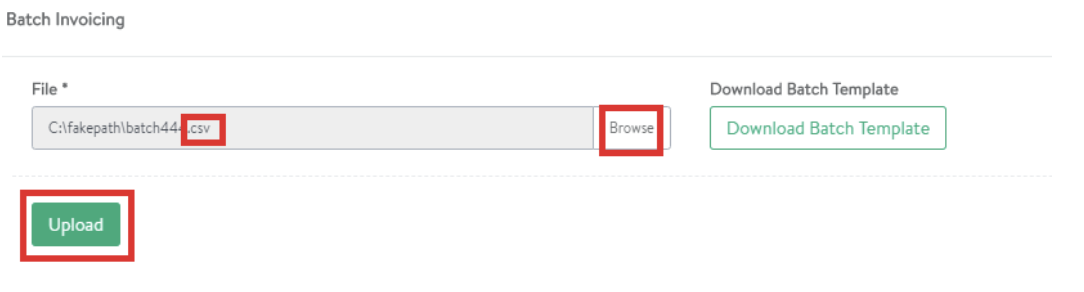
The system will automatically validate your file format and data integrity.
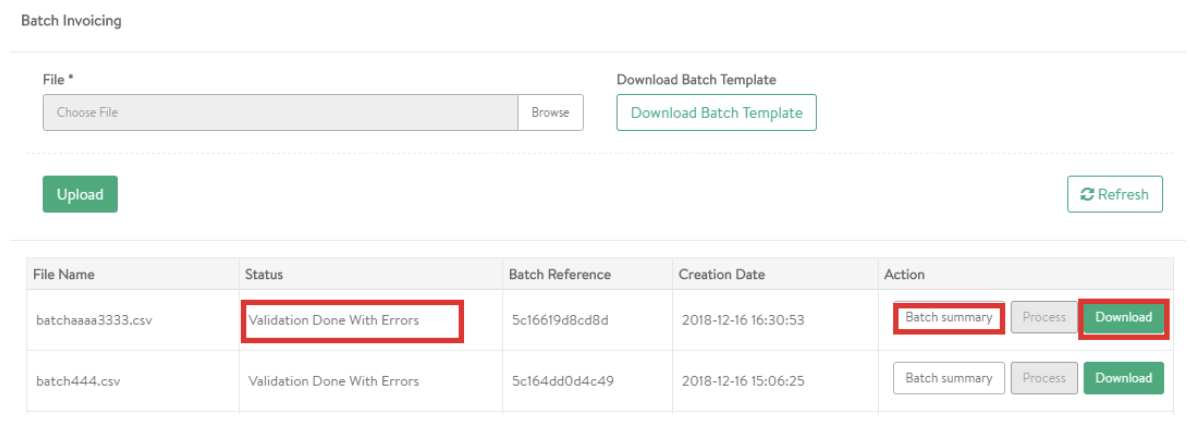
Review Validation Results
Check the validation status:
If validation fails:
- Status shows Validation with Errors
- Download the error report to review specific issues
- Fix errors and re-upload the corrected file
If validation succeeds:
- Status shows Batch Validated Successfully
- Proceed to process the batch

Process Batch
- Click the Process button to execute the batch
- Payment links are generated and sent to customers
- Delivery method follows the
notification_typespecified in your CSV
The system will create all payment links simultaneously and deliver them via EMAIL, SMS, or both based on your configuration.
Through the API
API integration provides full batch processing capabilities including refunds, captures, void authorizations, and payment links with programmatic control.
Prerequisites
Before implementing API batch processing:
-
Batch Service Active - Ensure batch processing is enabled on your account, contact merchantsupport-ps@amazon.com to enable this service
-
Security Credentials
Retrieve your integration credentials from the merchant dashboard:- Log into your Amazon Payment Services account
- Navigate to Merchant Management → Security Settings
- Save the following values:
- Access Code - Authentication token for API requests
- Merchant Identifier - Your unique merchant ID
- SHA Request/Response - Keys for signature calculation
API Endpoints
File Upload Endpoint:
https://sbpaymentservices.payfort.com/FortAPI/upload/
Batch Operations Endpoint:
https://sbpaymentservices.payfort.com/FortAPI/batchApi/
Implementation Steps
Upload Batch File
Upload your CSV file using a multipart form POST request to the upload endpoint.
Request Sample:
<html>
  <body>
    <form action="https://sbpaymentservices.payfort.com/FortAPI/upload"
          method="POST"
          enctype="multipart/form-data">
      <input type="text" name="merchant_identifier" value="WeVJHPYm">
      <input type="text" name="access_code" value="s4lwuuoY5upZlZY5D6dr">
      <input type="text" name="service_command" value="UPLOAD_BATCH_FILE">
      <input type="text" name="batch_reference" value="BATCH-2024-001">
      <input type="text" name="language" value="en">
      <input type="text" name="signature" value="calculated_signature_here">
      <input type="file" name="file" value="batch_transactions.csv">
      <input type="submit" value="Upload Batch">
    </form>
  </body>
</html>
Refer to our Signature Calculation Guide for detailed implementation instructions and code examples.
Response Sample:
{
    "response_code": "50000",
    "service_command": "UPLOAD_BATCH_FILE",
    "response_message": "Success",
    "batch_id": "169996200016006622",
    "signature": "calculated_response_signature",
    "merchant_identifier": "WeVJHPYm",
    "access_code": "s4lwuuoY5upZlZY5D6dr",
    "batch_reference": "BATCH-2024-001",
    "language": "en",
    "status": "50"
}
Validate Batch File
After uploading, validate the batch file to check for format errors and data integrity issues.
Request Sample:
{
    "merchant_identifier": "WeVJHPYm",
    "access_code": "s4lwuuoY5upZlZY5D6dr",
    "signature": "calculated_signature_here",
    "service_command": "GET_BATCH_RESULTS",
    "batch_reference": "BATCH-2024-001",
    "language": "en",
    "batch_id": "169996200016006622"
}
Error Response:
If validation fails, the response includes detailed error information:
Line_Number,response_code,response_message,status,eci,fort_id,merchant_reference,amount,card_number,expiry_date,currency
"6","00001","Missing parameter","00","","","","","","",""
When validation errors occur, the batch status becomes Validated with errors. Review the error details, correct the issues in your CSV file, and re-upload.
Process Batch
Once validation succeeds, process the batch to execute all transactions.
Request Sample
{
    "merchant_identifier": "WeVJHPYm",
    "access_code": "s4lwuuoY5upZlZY5D6dr",
    "signature": "calculated_signature_here",
    "service_command": "PROCESS_BATCH",
    "batch_reference": "BATCH-2024-001",
    "language": "en",
    "batch_id": "169996200016006622"
}
Response Sample
{
    "response_code": "72147",
    "service_command": "PROCESS_BATCH",
    "response_message": "The Batch process request has been received",
    "batch_id": "169996200016006622",
    "signature": "calculated_response_signature",
    "merchant_identifier": "WeVJHPYm",
    "access_code": "s4lwuuoY5upZlZY5D6dr",
    "batch_reference": "BATCH-2024-001",
    "language": "en",
    "status": "72"
}
Monitor Results
After processing begins, monitor the batch status by repeating the validation request to get final transaction results.
Best Practices:
- Wait 5-10 minutes before checking results for large batches
- Implement retry logic for status checks
- Store batch IDs for future reference
- Log all API responses for troubleshooting
It's essential to handle transaction feedback correctly. Each payment transaction generates a response that your system must interpret and process to finalize transactions accurately.
For detailed parameter specifications, refer to our Batch Processing API Reference.
Go-live
Test your integration using one of our testing cards.
Make sure to visit our go-live checklist to go live with your integration.
Support
Need help with your integration? Contact our technical support team at merchantsupport-ps@amazon.com.